So after several months of coding and testing I’m pleased to announce the release of version 2.3r1 of the FlightView firmware and version 0.4r20 of the FlightView app. This update is both relatively minor (no really flashy new features) and very important. You can install or update the app now from TestFlight, and the app will handle the firmware update process for the FlightBox.
In addition to this blog post, I’ve also put together a short YouTube video that walks through the installation and the Setup Assistant.
Before we get to the good stuff, a few housekeeping notes:
New Docs Available
After several months of neglect, I’ve updated the documentation (live version here and downloadable PDF here), which now weighs in at 151 pages. It’s still a work in progress, but it is much more complete and should make the installation, configuration, and operation much easier. Thanks to everyone who suffered with the early drafts, and special thanks to Robbie Culver for edits, suggestions, and corrections.
Please Delete And Re-Install The App
Sorry to do this to you again, but changes to the mapping engine require things be moved around. The best way to insure everything ends up in the right place is to delete the app and re-install it. If you have created any checklists, back them up prior to deleting the app. You can do this from the iPad’s “Files” app:
- Launch the Files app
- Go to On My iPad
- Tap the new folder icon (folder with a + sign) and name the new folder “Backup”
- Open the FlightView folder.
- Select a checklist file (ends in “chklst”) by long-pressing it and selecting Copy.
- Go back to On My iPad and open the Backup folder.
- Long-press anywhere in the folder and tap Move.
- Repeat steps 4 – 7 for each checklist file.
Once you’ve moved all of the checklists to the backup folder, delete the FlightView app and re-install from TestFlight. You can then reverse the process to move your checklists back into the FlightView folder. (And don’t worry – I’m working on an enhancement for the next release that will automatically back up your checklists. Apologies for the inconvenience.)
Firmware Update Required
The changes to add user-defined sensors required an update to the FlightBox firmware. Once you’ve installed the new version of the app from TestFlight, launch it and it will download the firmware update. (When the download completes you’ll see an alert message saying “FIRMWARE UPDATE” and Jeeves will announce that the update has been downloaded.) To update the FlightBox:
- Power up the FlightBox
- Connect to the FlightBox Wifi network from your iPad
- Open the FlightView app and go to More… → Menu → System Hardware → Flight Data Computer.
- Tap the “Install Firmware Update” button at the top of the page.
Doing this will push the update to the FlightBox and start the installation process. Do not cut power to the FlightBox while updating. The update process takes several minutes and the FlightBox will reboot twice during the update. When the update is complete you may have to re-connect your iPad to the FlightBox Wifi network.
EMS Configuration After Firmware Update
After the update the EMS will import any existing calibration data for fuel tanks, but all the other EMS inputs will need to be switched back on by selecting the appropriate sensor. Go to More… → Menu → System Hardware → Engine Monitor and update the values for each of the inputs you’re using. This is a one-time thing.
* * Now, on to the good stuff… * *
User-Defined Sensors Are Finally Here!
The most common user request has been for various additional engine sensors. And there are a lot of different sensors out there. Rather than try to build definitions for all of them into FlightView, I decided to make it easier for users to roll their own.
Check it out: More… → Menu → System Hardware → Engine Monitor
As a kid, I think I first heard the term “sensors” used on reruns of the original StarTrek. You regularly heard Mr. Spock say things like, “Captain, sensors indicate there are no lifeforms on the planet.” Or, “Captain, sensors are picking up a Klingon ship entering the system at warp 3.” Sounds impressive, highly technical, and very expensive. Fortunately, engine sensors (and senders, and transducers, and pickups) are a good bit more mundane. Most of them use one of a few basic electrical properties to indicate something useful: How much gas is in the tank? How many times per minute is the engine revolving? How much pressure is the oil pump producing? You get the picture.
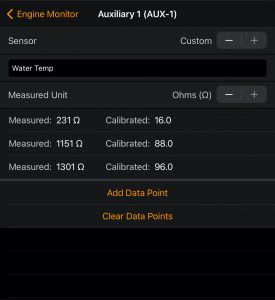
Most of these measurements are indicated using volts (the electrical “pressure” in a circuit), ohms (the resistance in a circuit), or pulses (voltage changes from low to high or high to low). As the thing being measured – oil pressure, fuel level, engine speed – changes, the sensor adjusts its output voltage, resistance, or pulse rate. The EMS box reads these values and converts them from the raw unit (volts, ohms, pulses) into a calibrated unit (PSI, gallons remaining, RPM). Calibrating a sensor is simply a matter of creating a map between measured values and calibrated values.
The calibration will need either data provided by the manufacturer or data collected by performing your own calibration test. Manufacturer data is generally provided as a table or a graph. A table is a list of measured values and their corresponding calibrated values. A graph is the same information depicted on a chart that lists the measured value on one axis and the calibrated value on another. If your sensor comes with manufacturer calibration data all you need to do is carefully copy it into the configuration in FlightView.
If your sensor does not come with data you can generate it yourself by running the sensors through its full range while recording the calibrated value (temperature, pressure, etc.) and the measured value (volts or ohms). You can use FlightView to measure these values, but you can also use a standard multi-meter. A full rundown on calibration tests is beyond the scope of this blog post, but the process isn’t particularly difficult. I will be adding a section to the User and Installation Guide explaining this in detail.
New Gauges
This version adds support for a number of new gauges. These include:
- Propeller RPM
- Fuel Tank 3 (Header)
- Carburetor Temperature
- Coolant Temperature
- Turbine Intake Temperature
- PRSU Temperature
Unlike the original set of gauges, these are not automatically tied to an input from the EMS. If you opt to use one of them, you will need to assign it an input (an EMS “port”) as the data source. In most cases, you will want to use one of the two auxiliary inputs (Aux 1 and Aux 2) with a custom sensor configuration.
EMS Gauge Input Assignments
Previous versions of FlightView had a fixed mapping between an input on the EMS box and a gauge on the screen. This made things easy if you had a traditional aircraft engine and used the recommended sensors but it was a bit inflexible. In this version you can assign any input to any gauge. A combination of user-defined sensor calibrations and user-assignable inputs for gauges really expand what can be represented on the engine display.
EMS Input Diagnostics
To make it easier to see what’s going on with the EMS, I’ve added a new diagnostic screen under Engine Monitor. This shows you the raw values that the EMS inputs are seeing.
Map and Terrain Update
The mapping engine that I use for the moving map in the MFD and the mini-map on the PFD received a very nice update in the form of integrated terrain data. Up to now, the terrain alert system and the terrain profile view have been using a very large data set that I assembled from NASA’s Shuttle Radar Terrain Mission or SRTM collection. It worked well, but was huge and I had no way to project that data onto the map. The map engine update added shaded terrain at higher zoom levels based off of a a highly compressed set of terrain data – double win. The only down side is the compressed data takes longer to access, so it may take upwards of a minute on an older iPad to render a profile view for a long cross country route. A worthwhile trade in my book.
The new map engine also ships with a much more detailed background map. I would still recommend installing the state-by-state base maps for areas where you fly frequently, but the updated background includes rough outlines for water (oceans, lakes, large ponds, rivers) and borders. This means that if you fly into some state for which you don’t have detailed base maps you’ll still see some land features in addition to the airports, airspaces, runways, and other aviation information.
Traffic Target Identity
Ever wonder who that is 10 miles ahead and 1000 feet above you? I do. So I added a feature that downloads and installs a copy of the US Releasable Aircraft registry database. Just tap on the aircraft and a popup will appear with the details. To install the registry data, go to More… → Menu → Downloads and tap the download button for the Aircraft Registration Database.
Checklist Editor
Up to this point the checklist feature required you to create the list in Chekov and then import it to FlightView – not the ideal process. This version includes the full editor from Chekov, so no more painful sharing process.
Known Issues
Ok, so there are still a few small known bugs in the app:
- If you switch over to the FlightBox-XXXX Wifi network immediately after completing the Setup Assistant (the onboarding wizard that runs on first startup), the app will not talk to the FlightBox. Kill the app using the task manager and restart it and it connects just fine. It also connects fine on any subsequent connection.
- The app loads unnecessary alerts at startup and after engine shutdown. Specifically, the “Transponder Offline” alert on startup and the “Oil Pressure Low” alert on engine shutdown. These are somewhat annoying but fortunately clear on their own after a moment.
- Fuel reading need a filter – they jitter (jump around) a bit if the tank is constructed in a way that allows fuel to slosh around.
- V-Speeds erroneously uses the label VG rather than VLO for gear deploy speed.
- Runway safety callouts are intermittently dropped (no alert is posted).
- Aircraft limit warnings (descent rate, airspeed, altitude, attitude) are not operational.
- Hobbs time screen (More… → Menu → System Hardware → Engine Monitor) is not accessible.
All of these were discovered as I combed through the app to update the docs, so there’s another good reason for keeping the documentation up to date. I should be able to get them all fixed in the next release – hopefully in the next few weeks depending on what kind of bug testers turn up.
. . .
So those are the big new things (and a few bugs). The update also includes quite a few bug fixes and under-the-hood tweaks. You should find the performance is slightly better. This update also paves the way for other enhancements that will be coming in future releases. To everyone who has been waiting for this, thank you for your patience. Please let me know if you have any questions, and please continue to send me suggestions and bug reports.
[/fusion_text][/fusion_builder_column][/fusion_builder_row][/fusion_builder_container]